Integrating Asterisk and Ekiga.net behind a firewall
Asterisk is an open source telephone switch (PBX). Although it can be used in complex environments, it can also be deployed for simple home use.
I was planning on Describing the set up and configuration for my Asterisk server, but I found that there are many good tutorials that already cover the general steps. For example, this one from our fellow KWLUGer and Linux trainer extraordinaire rpjday
http://www.crashcourse.ca/wiki/index.php/Asterisk_on_Kamikaze
Normaly you use Asterisk with a telephony provider such as Unlimitel, Voip.ms, MyDivert.com and many others; from which you can get a real telephone number.
Ekiga.net is a free VoIP provider. It does not give you a phone number, but an account name. Very similar to MSN Messenger or Yahoo Messenger or Skype, the main difference is that you can associate that account with your Asterisk phone system.
Why?
I know that we enjoy being in front of our computers all day, but, when we are away from the computer, it is quite convenient to have the phone ring and receive an ekiga call even when the computer is turned off.
Ekiga is also the name of a free Softphone application provided by Ekiga.net and available in the repositories of most Linux distributions. There is also a Windows version for those friends and family which you haven't converted. During the set-up it will allow them to create a new ekiga account.
So assuming that you have an Asterisk server installed and you are able to call from extension to extension inside your network, I'll proceed to explain the simple steps to integrate with Ekiga.net
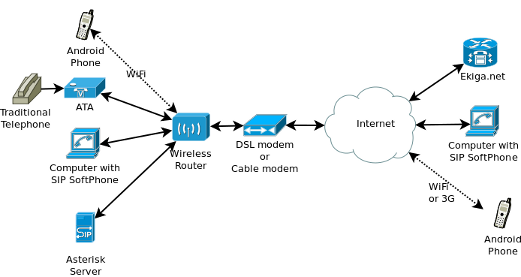
First, Here is my target physical architecture for this simple configuration:

While the Ekiga Wiki has good information regarding the integration, It assumes an Internet facing server. If your Asterisk server faces the internet, just follow the instructions. If like me, your server is behind a firewall, you'll need some extra steps.
Ekiga as an Asterisk client explains how to use Ekiga as a SoftPhone (phone extension) registered to your Asterisk Server. I http://wiki.ekiga.org/index.php/Ekiga_as_an_Asterisk_client
There is no problems with these instructions. Just follow them
Connecting Asterisk to ekiga.net explains how to configure Asterisk to send and receive calls through the Ekiga network
http://wiki.ekiga.org/index.php/Connecting_Asterisk_to_ekiga.net
Given that my server is behind a firewall as you can see in the diagram, and that I do not have a static IP; after following those instructions I had to do the corresponding adjustments to sip.conf
No Static IP, server Behind a firewal
To overcome this problem I registered for a free DNS name at DynDNS.com, this way even when my IP address changes I still have the same domain name. Most routers these days have an option to configure a DynDNS account. If that's not your case, you can still run a daemon on the server that will synchronize your IP address and domain name at regular intervals.
Once I had my DynDNS I added the following lines to the [general] section of sip.conf as explained at voip-info.org
externip=<my dynDNS domain name>

localnet=<IP base for my network>/255.255.255.0
e.g.
externip=mynetwork.homeip.net

localnet=192.168.1.0/255.255.255.0
and added the following line to the [ekiga] section of sip.conf
nat=yes
I restarted Asterisk
$ sudo /etc/init.d/asterisk restert
Firewall port forwarding
The final step is to forward UDP ports 5000 - 5100 on your firewall to go to your Asterisk server.
And that is it, you will be able to send and receive calls to and from other Ekiga users, just don't forget to use the corresponding prefix. (e.g. 9 in our example).
Reference:
www.asterisk.org
www.ekiga.org
www.ekiga.net
www.dyndns.com